Webhook Integrations
- SixthSense supports multiple webhook integrations for sending notifications.
- All webhook integrations use the same authentication mechanism, while the payload/template structure may vary depending on the receiving endpoint/webhook URL.
Viber Webhook Integration
Create a webhook URL in the Viber
- Create a Channel – only Channel super admins can get access to API.
- Must be using a version of Viber 17.7 or higher.
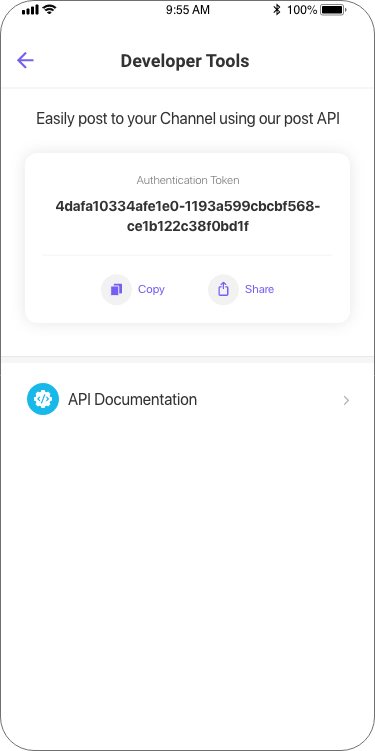
- Obtain Authentication token. In order to implement channels API, super admin need to obtain an authentication token unique for their Channel. You can do this by entering your Channel’s info screen-> scroll down to “Developer Tools” -> copy token -> use the token for posting via API.
Setting/Creating a webhook URL
Once you have your token you will be able to set your Channel’s webhook. To send messages using this API, it is necessary to set a webhook.
Setting the webhook will be done by calling the set_webhook API with a valid and certified URL. For security reasons only URLs with valid and official SSL certificate from a trusted Certificate Authority will be allowed. This action defines the account’s webhook and the type of events the account wants to be notified about.
Once a set_webhook request is sent Viber will send a callback to the webhook to check its availability. The webhook must reply with status 200 for the request to succeed.
- Request
- You will see Set webhook Response as below
note
event_types are deprecated, please ignore
Get Account Info
The get_account_info request will fetch the account’s details as registered in Viber. The account admin will be able to edit most of these details from his Viber client.
The Sender IDs of the Channel superadmins (role “superadmin”) and admins (role “admin”) can be found under the “members” field of the response. Only the superadmins’ ID should be used as the sender ID with this API.
- Request
- Response
Sending a sample message/events using created webhook URL
In order to post to your Channel you will need to send a POST request with the below properties.
- Request
- This will sned a sample message/event Hello world! to the created viber channel using user_id & auth_token.
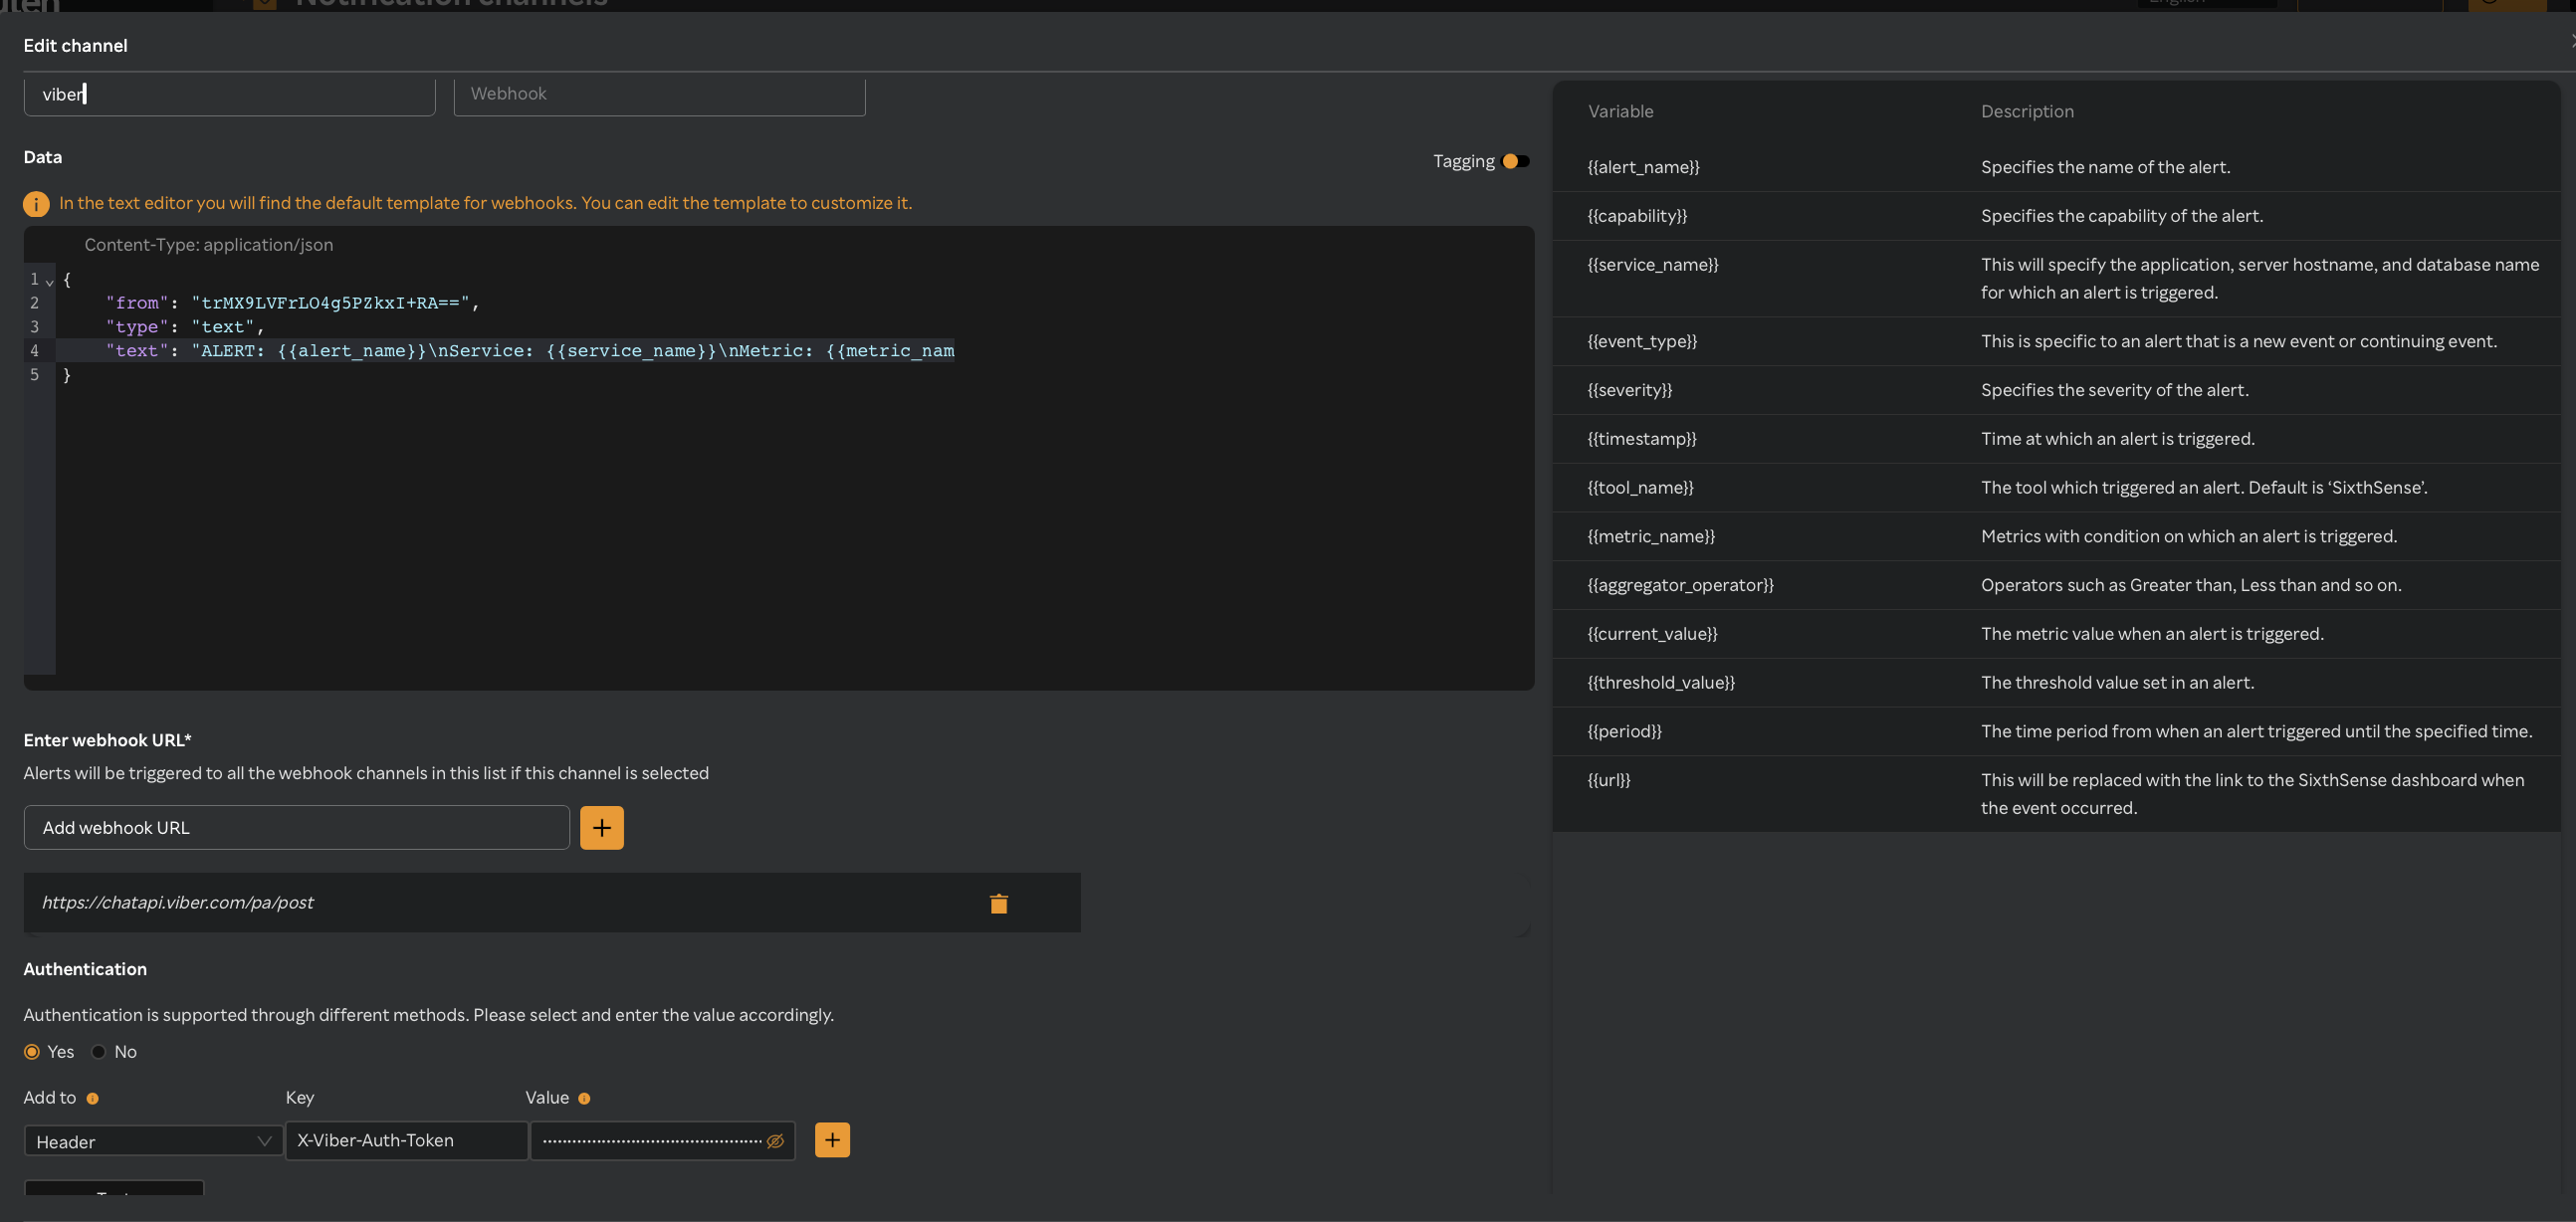
Sixthsense sample template/payload to send alert events to viber
note
- Now we can modify the variables with sixthsense supported webhoook variables in the above template.
- Auth token is passed in Header via webhook Authentication.
Pagerduty Webhook Integration
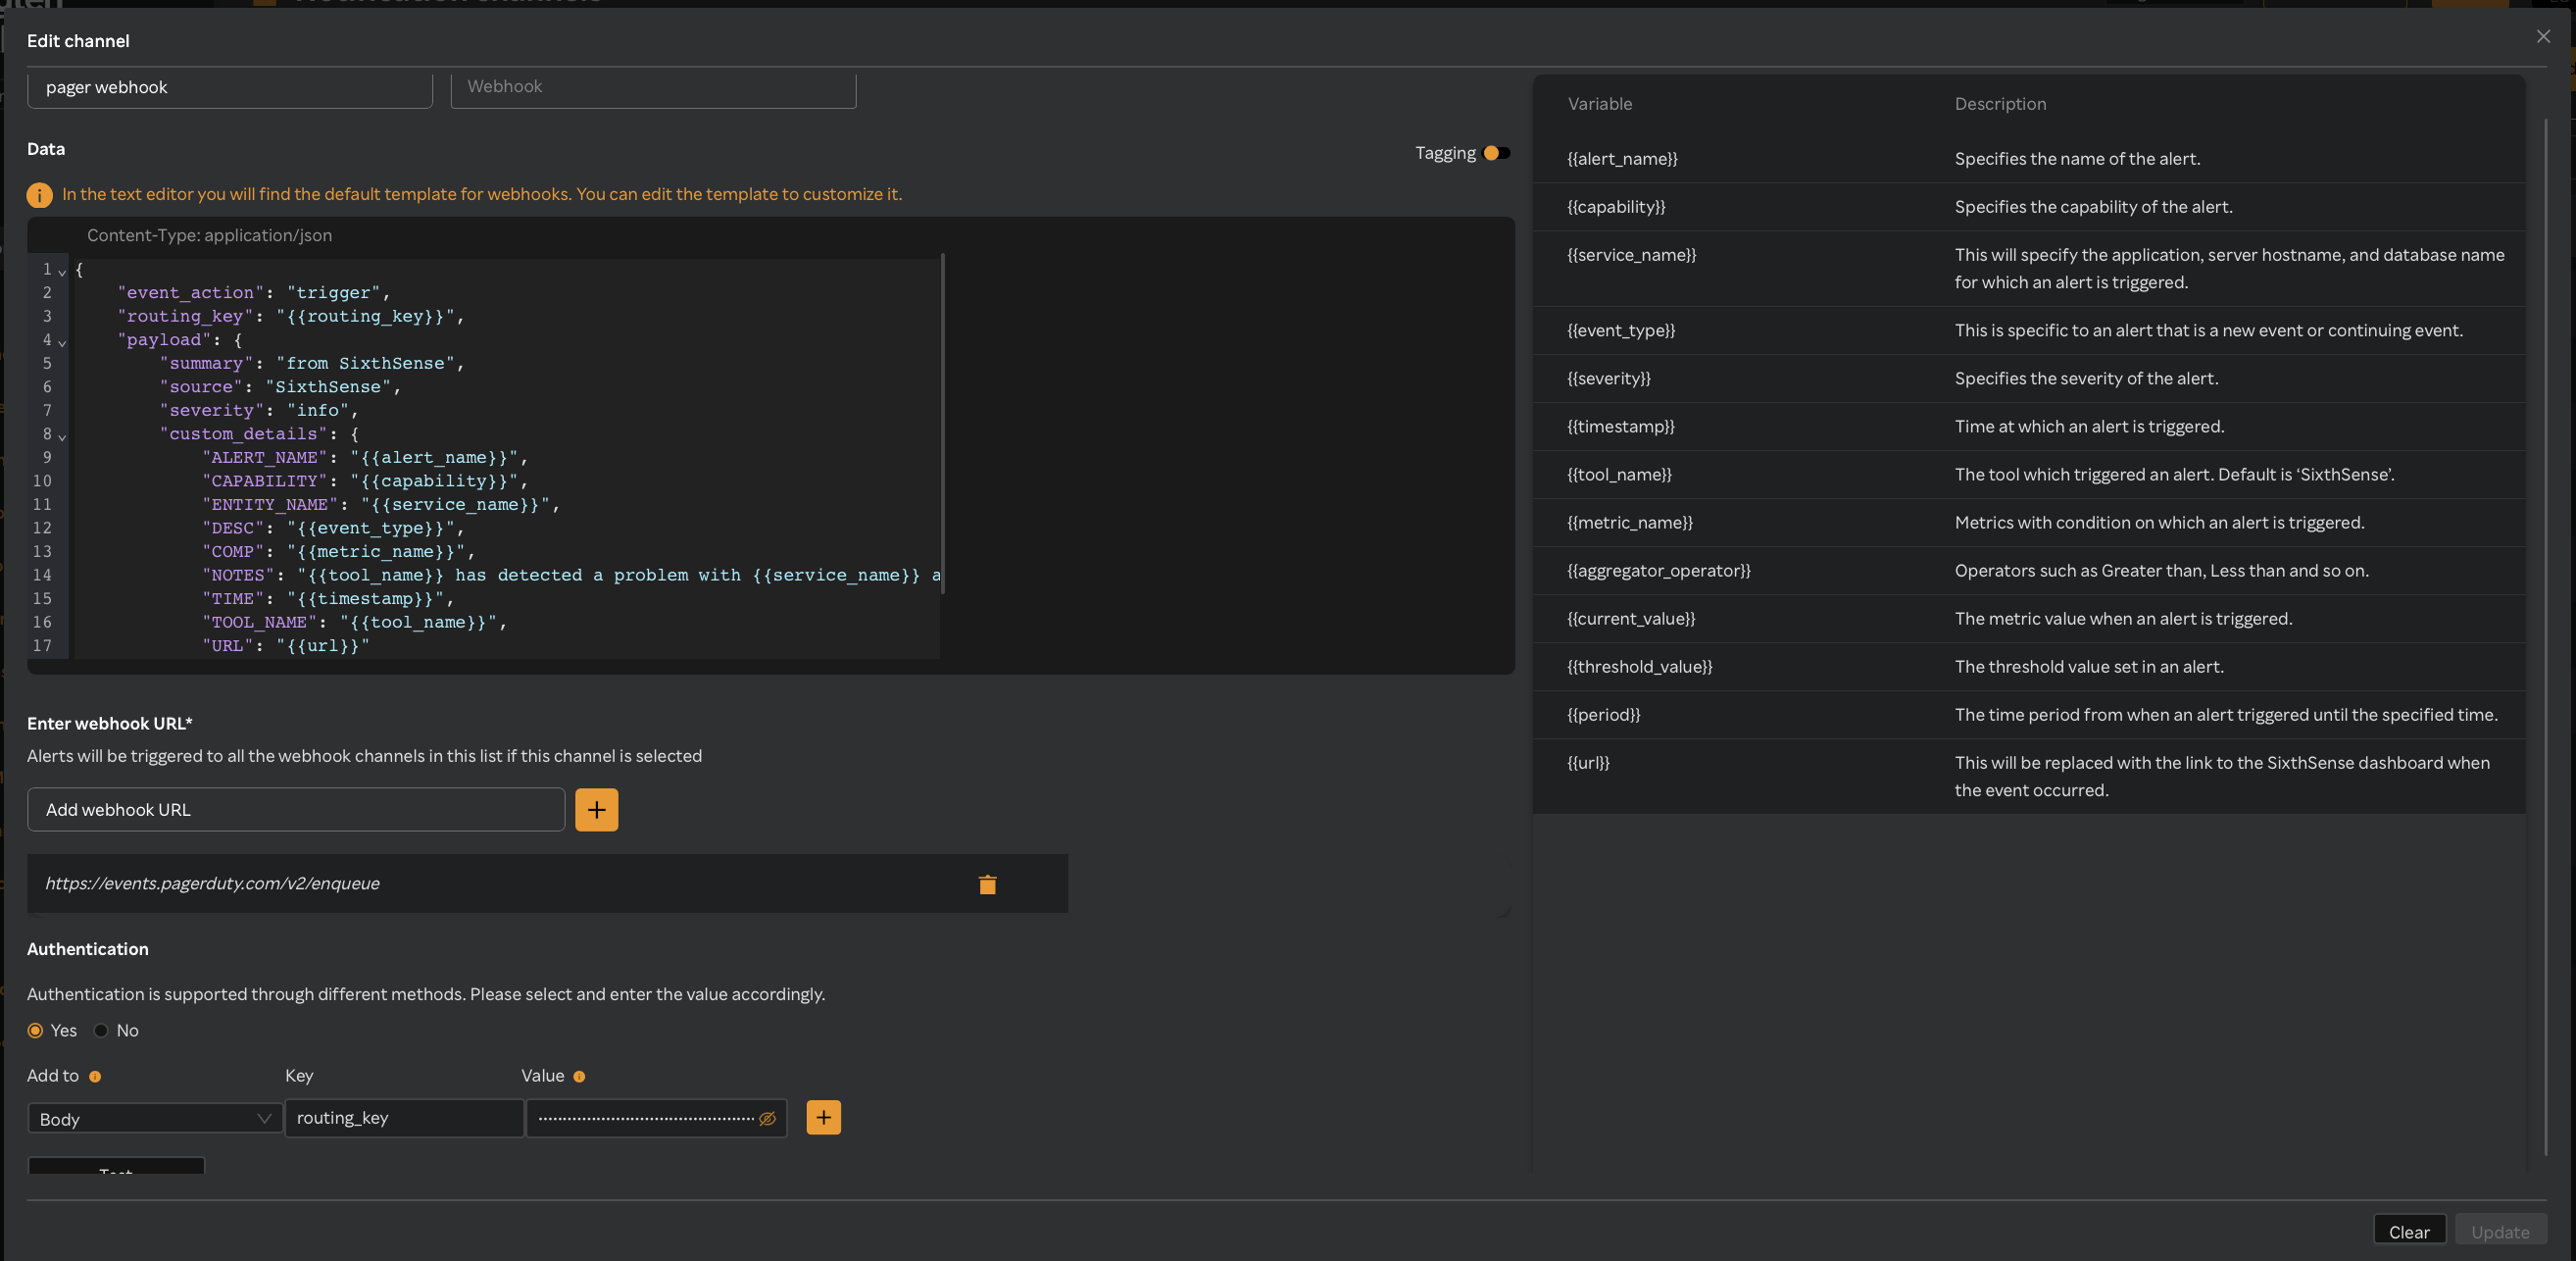
- We use Events API in pagerduty to push alerts from Sixthsense.
- Events API: Allows you to add PagerDuty's advanced event and incident management functionality to any system that can make an outbound HTTP connection. This API is specifically designed for sending event data (like alerts from SixthSense) into PagerDuty to trigger incidents. It allows you to add PagerDuty's incident management capabilities to your existing monitoring and alerting systems.
Integration with SixthSense Alert:
Please refer
- PagerDuty Events API v2 Docs
- PagerDuty Summary Payload to 'enqueue'
- PagerDuty Events API V2 API reference
Zendesk Webhook Integration
Create Webhook URL in Zendesk via UI
- Log in to your Zendesk Admin Center
- Admin Center → Apps and integrations → Webhooks
- Click “Create Webhook”
- Name: Alert System Webhook (or something descriptive)
- Endpoint URL:(Use a real endpoint like your external system or a mock one like https://business.com/)
- Request Method: POST
- Request Format: JSON
- "Connect webhook to a trigger or automation" ☑️ This is important if you're creating the webhook to react to ticket events
- Authentication: Choose API key, Basic Auth, or Bearer Token
- Click “Create Webhook”. You’ll now see it listed in your Webhooks section.
Integration with SixthSense Alert:
Sample template:
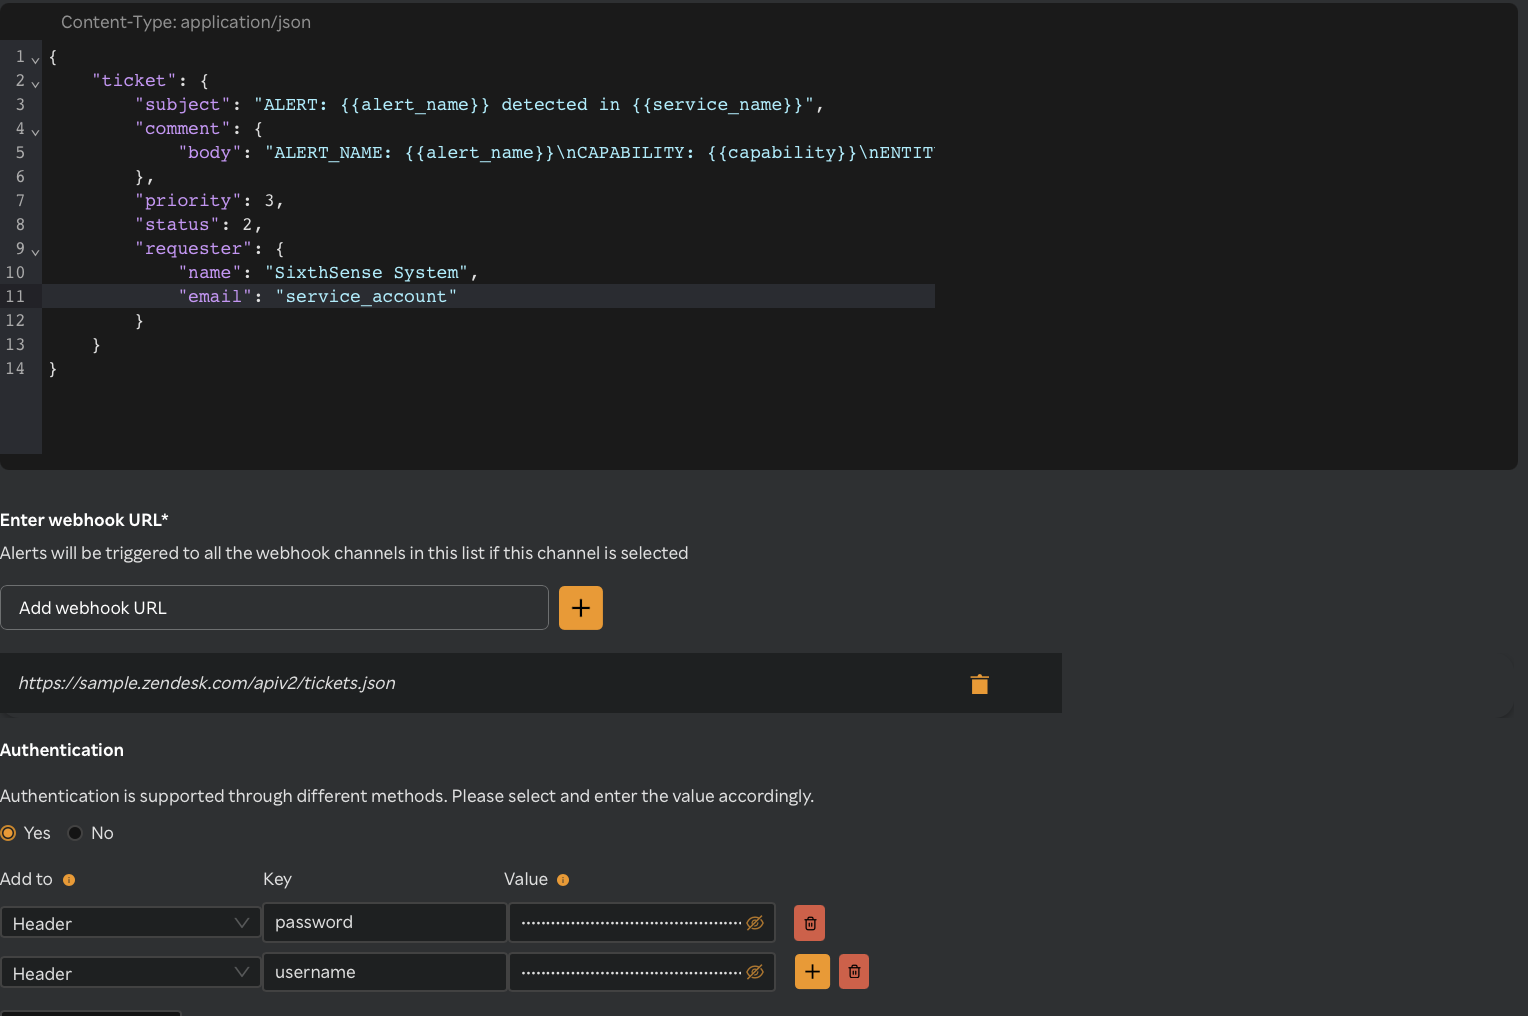
Please refer zendesk docs
Jira Integration
Jira is a popular project management and issue tracking tool developed by Atlassian. It's widely used by software development teams, IT support teams, and other business teams to plan, track, and manage their work.
Creating an API Token (Jira Cloud):
- Log in to your Atlassian account: Go to id.atlassian.com(opens in a new tab) and log in with the account you use to access Jira. This is the Atlassian account, not necessarily your Jira-specific username/password if you're using SSO.
- In the left-hand navigation, click on "Security." Then, click on "API tokens." If you don't see "API tokens" under Security, you might need to contact your Jira administrator, as they might have disabled this feature.
- Click the "Create API token" button.
- Label Your Token: Give your token a descriptive label (e.g., "My Webhook Token," "Postman Test Token"). This helps you remember what the token is used for.
- Click the "Create" button.
- Immediately copy the generated API token to a safe place. You will not be able to see it again after you close the dialog. If you lose it, you'll need to create a new one.
- Authentication with the API Token (Jira Cloud):The most common way to authenticate with the Jira API using an API token is with Basic Authentication. You'll combine your Atlassian account email address with the API token and then Base64 encode the result. See Jira API Tokens
- Username: Your Atlassian account email address (the one you used to log in to id.atlassian.com).
- Password/API Token: The API token you just created.
- Combine: Create a string username:api_token.
- Base64 Encode: Base64 encode the string using UTF-8 encoding.
} }
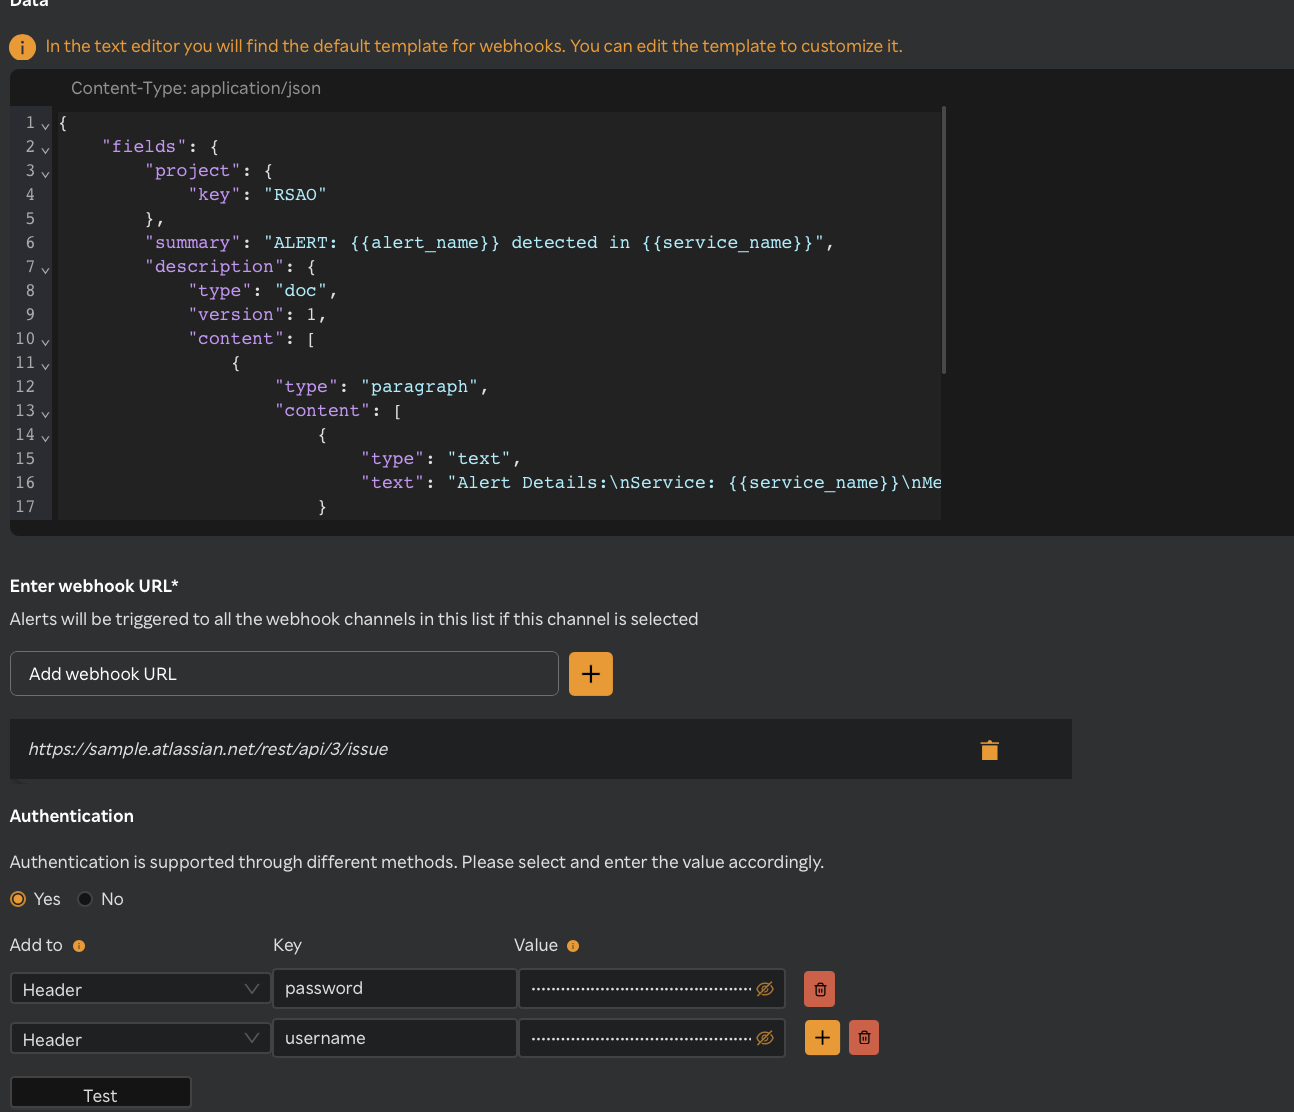
Integration with SixthSense Alert:
Sample template:
MS Teams webhook Integration
- Open Microsoft Teams.
- Click Add channel to create a channel for your team.
- Click Manage channel.
- Click Edit under the Connectors.
Provide the necessary permissions for the user.
- Search for Incoming Webhook under the list of connectors for your team.
- Click Add if it is not added or click Configure.
- Provide the Name where the notifications will be received.
- Click Create.
- Copy the given URL which will be the webhook URL to create the Notification channel.
- Click Done once the URL is copied.
- Close the form.
The webhook notification channel is created. Add notification channel using the following procedure.
- Login to the Observability portal.
- Navigate to the Notification channels on the left pane.
- Click Add channel.
- Select Webhook from the Channel type drop-down list.
- Use the Teams Webhook variable as per the SixthSense webhook variables and change the json file in the editor as follows:
“name”: Microsoft teams variables is mapped with “value”: the SixthSense variables.
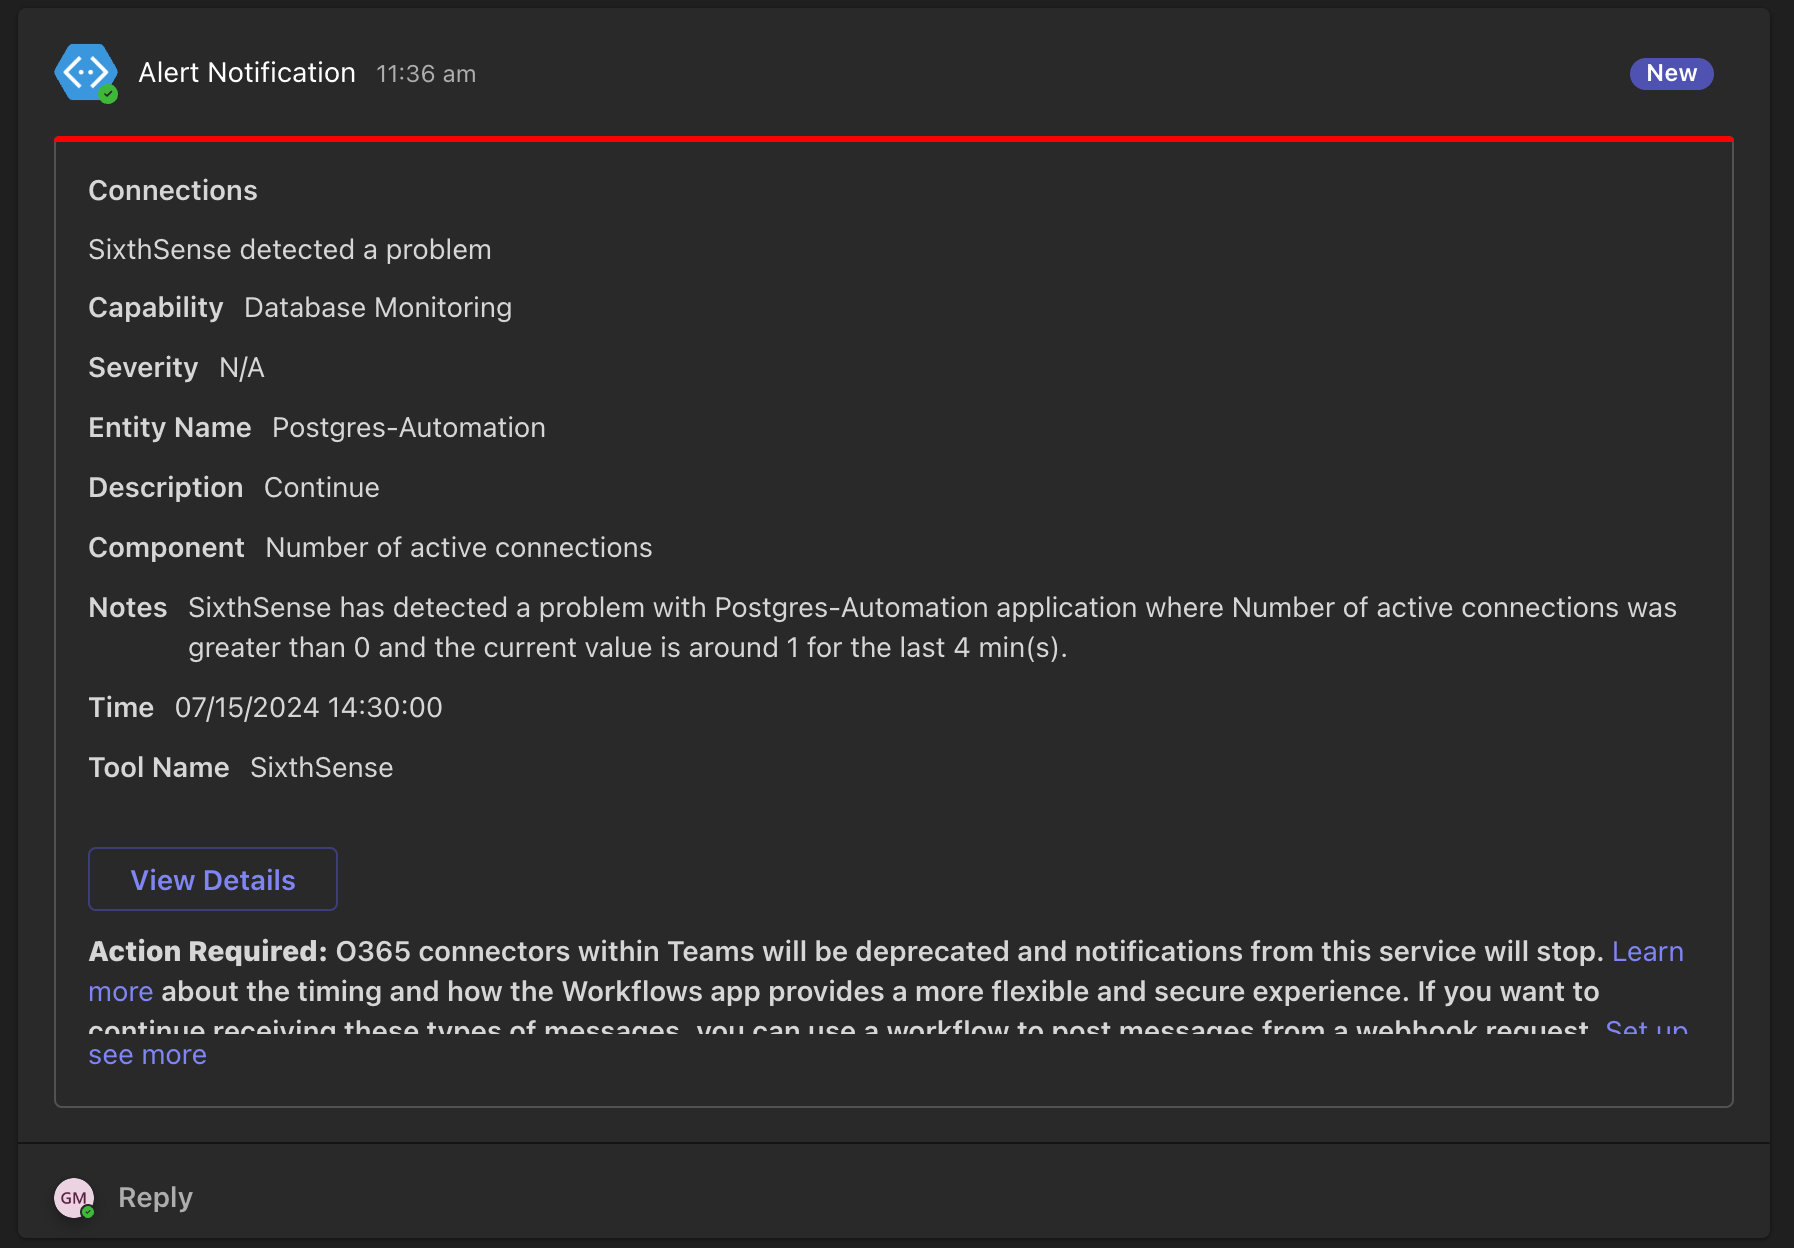
The Notification received will appear similar to the following screen.
- Click View Details to navigate to the SixthSense dashboard.